Fixing the LaserJet 2P Error 52
One day my HP LaserJet IIP, instead of printing, just gave out an error message. "Error 52" it said. A quick google search revealed that this most likely was the laser scanner motor assembly, somewhere deep inside the printer. The IC which controls the step motor to rotate the mirror overheats and burns. I read that this is due to a production problem in the first series of the LaserJet 2P, and it seems to be a very common problem, too. Pressing ALT-Continue solves the problem temporarily, but if the IC is burnt, that does not help, of course.
The HP Part number is RG1-1771-000CN, more information can be found at HP partsurfer
The chip is a Hitachi HA13455 AMP 9H, for the ones who just want to replace the chip. Better check that information twice! And take a look here Chip replacement
The chip is out of production and costs around $11 if you're lucky enough to find someone in your country who sells this ancient part. It can also be found on 5 1/4" floppy disks and some VCRs.
The error is easily recognizable, because the motor just doesn't spin up anymore. You can't hear the high-pitched noise while printing. The error can also be caused by a scanner motor that fails to stabilize. You will then hear the motor spin up, much higher than normal.
Sound examples:
- Normal operation (laser scanner spinning up) 39k
- Not stabilizing (laser scanner spinning up higher and higher) 117k
There is of course no example of the scanner motor refusing to spin up.
I at first had the first type of error: The silent one. Now, some months later, my replacement scanner assembly is not always stabilizing...
A reader of this tutorial reported that he found a dead fly inside the black laser box, which caused the error. So, before buying replacement parts, you should have a look inside...
I bought another LaserJet with Error 50 on eBay, so it was cheap, and this error isn't related to Error 52. You can also buy the Laser Scanner Unit somewhere, it costs around 70 Euro.
I decided to write this manual as it is a little complex to remember all the screw positions the first time. In my opinion there's only one logical way to do it - everybody
can find it out, but it is nice to know how it will look like inside beforehand.
So here it is, the incomplete, but maybe helpful step-by-step repair manual. All you need is a screwdriver and some time. If I forgot some screws, figure it out yourself. Before you begin, be sure to search the web for other possible error reasons. But disassembling the printer to check if the IC is destroyed can't hurt... at least if you pull the plug beforehand.
Good luck!
I take no responsibility in any way if you break your printer completely, or whatever else might happen.
Especially do not switch on the printer while opened: the laser is a very dangerous device and might hurt your eyes
badly - you will not see the harmful infrared light! Also remember that capacitors in the power supply can still contain
high voltages even if the printer is turned off and disconnected.
1. Pull the plug. ;)
2. Open the printer door, as if to replace the toner.
3. Unscrew the two screws at the back. As there are only two, you won't need an image for that.
4. Unscrew the top of the case.
The left screw doesn't need to be removed completely.
5. Lift the top of the case. Be careful, the display cable needs to be unplugged.
6. Remove the sides of the case. There are no screws.
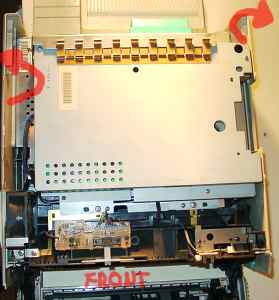
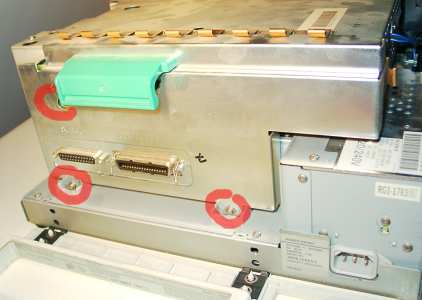
7. Some more screws at the back. The screws at the bottom only need to be loosened.
Remove the interface part with the handle.
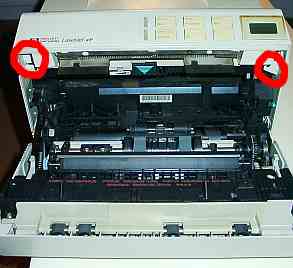
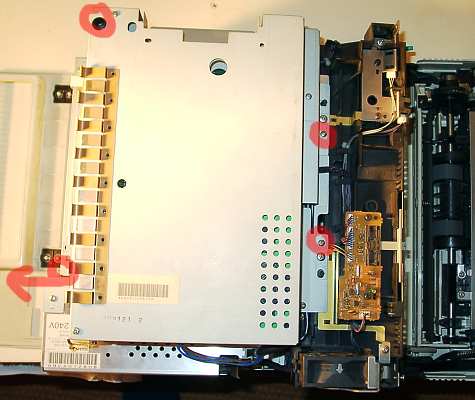
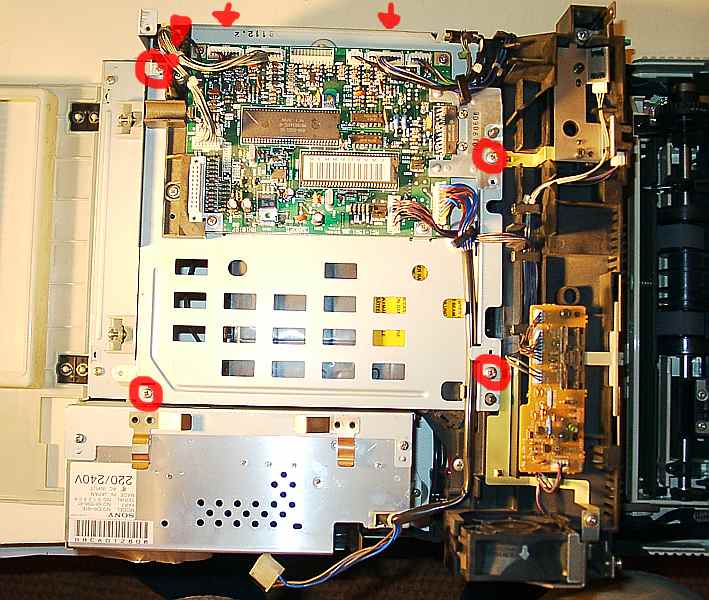
8. More things to take off. Remove the screws (if in doubt, the small ones). If the RAM card is in your way, remove it beforehand (red arrow).
This information will save you a bit of work... I unscrewed a lot more than that.
Pull out the power cable, to be seen at the bottom of the image (not marked)
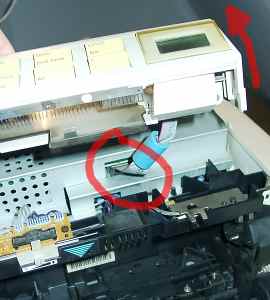
9. Unplug all the cables. Be careful (marked with "!"), there's a fiber optic cable that must not be bent too much, kinked, or removed. Keep your fingers away from it, it bites! ;)
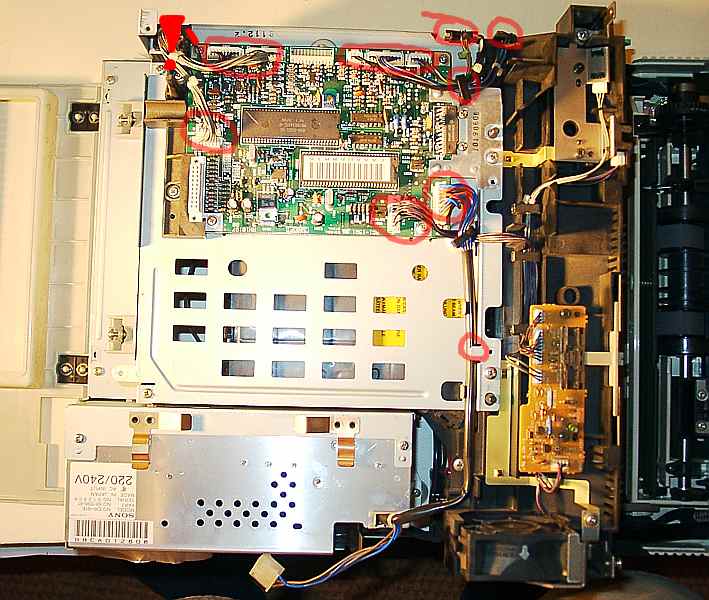
10. Six more screws. Remove the board (to be more precise: the plate with the board on top), and be careful with the fiber optic cable
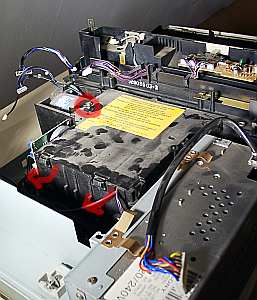
11. You're almost at the core. The box has to be opened. One screw, some clamps. From now on there shouldn't be much dust around.
I admit, there is dust. But that's just the old printer I bought to repair the other one.
12. Unscrew the three screws of the main lens. Remove the lens, don't touch it. Remove the plug. Beware of the fiber optics cable (yellow dots) and the tiny mirror. If you touch this one, the printer will not be able to print anymore as it probably can't detect the laser beam. The mirror cannot be adjusted at home. There's an error code for that, too ;)
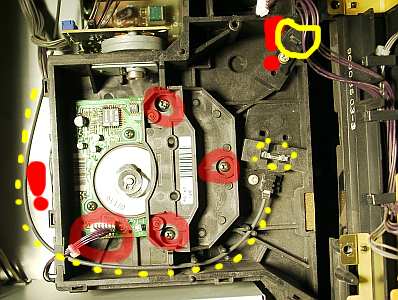
13. This photo still shows the main lens. You just have removed it. Don't get irritated, I didn't have a photograph without it.
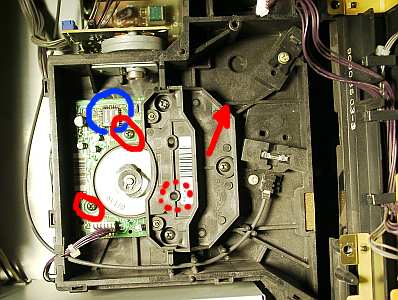
The laser scanner unit is the only electronics board inside the "laser box". There are three screws. Remove the thing, the IC (marked blue) might look burned.
Insert your brand new or used Laser Scanner unit. Don't touch it's mirror, as you still want to print with it.
That's all. Now reassemble your printer completely (don't forget any screws or put them into the wrong places), switch it on and print a test page. It worked perfectly for me.
Questions? Errors? Contact me at